Safety guidelines
We would like to welcome you among Ducati enthusiasts, and congratulate you on your excellent choice of motorcycle. We think you will ride your Ducati motorcycle for long journeys as well as short daily trips. Ducati Motor Holding S.p.A. wishes you smooth and enjoyable riding.
Your motorcycle is the result of Ducati Motor Holding S.p.A.'s on-going research and development efforts. It is important that you preserve its quality standard by strictly observing the maintenance plan and using genuine spare parts.
This manual provides instructions on minor maintenance operations. Major maintenance operations are described in the Workshop Manual available to Ducati Authorised Service Centres.
In your own interest, for your safety and in order to guarantee product reliability, you are strongly advised to refer to our authorised Dealers and Service Centres for any operations listed in the scheduled maintenance chart, see page 311.
Our highly skilled staff have access to special implements and appropriate equipment required to perform any servicing job at best, and use Ducati original spare parts only as the best guarantee for full interchangeability, smooth running and long life.
All Ducati motorcycles come with a Warranty Card. The warranty does not apply to motorcycles used in racing competitions. Tampering with or altering any components, even partially, will make the warranty null and void effective immediately. Improper or poor maintenance, using other than original spare parts or parts not expressly approved by Ducati may invalidate your warranty rights and lead to damage or loss of performance.
Your safety and that of other road users are very important. Ducati Motor Holding S.p.A. recommends that you ride responsibly.
Before using your motorcycle for the first time, read this entire manual carefully and closely follow the guidelines outlined in it. The manual provides full information on proper motorcycle operation and maintenance. In case of any doubts, please contact a Dealer or Authorised Service Centre.
Instrument panel
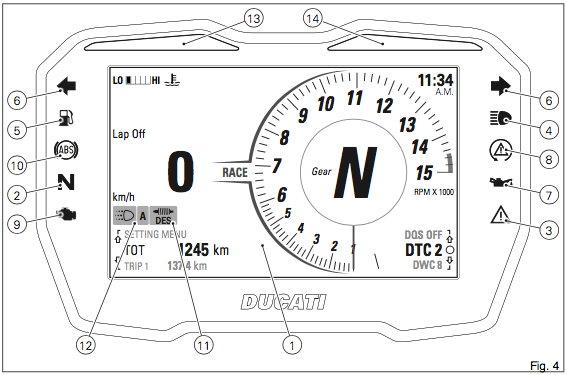
- DISPLAY
- NEUTRAL LIGHT N (GREEN) Comes on when in neutral position.
- GENERIC ERROR WARNING LIGHT YELLOW) It turns on when there are any "vehicle" errors, i.e. active errors triggered by any control unit other than the engine control unit.
- HIGH BEAM LIGHT (BLUE) It turns on to indicate that the high beam lights are on and when the flasher is activated.
- FUEL WARNING LIGHT (AMBER YELLOW) Comes on when fuel is low and there are about 4.5 litres (1.19 gallons) of fuel left in the tank.
- TURN INDICATOR LIGHTS (GREEN) Illuminates and flashes when the turn indicator is in operation.
- ENGINE OIL PRESSURE LIGHT (RED) Comes on when engine oil pressure is too low. It must turn on at "KEY-ON", but must turn OFF a few seconds after the engine has started. It may shortly come on when the engine is hot, however, it should go out as the engine revs up.
- DAVC LIGHT (AMBER YELLOW) This light indicates DTC/DWC/DSC system enabling/ disabling status.
- Light off: DTC/DWC/DSC enabled and functioning;
- Light ON flashing: DTC/DWC/DSC enabled, but with degraded performance;
- Light steady ON: DTC/DWC/DSC disabled and/or not functioning due to a fault in the control unit.
- ENGINE DIAGNOSIS - MIL LIGHT YELLOW) It turns on in the case of "engine" errors that in some cases will lock the engine.
- ABS LIGHT (AMBER YELLOW) Indicates ABS status.
- Light off: ABS enabled and functioning;
- Light ON flashing: ABS in self-diagnosis and/or functioning with degraded performance;
- Light steady ON: ABS disabled and/or not
- DES LIGHT (AMBER YELLOW)
- Light OFF: DES active;
- Light ON flashing: DES in degraded mode or in initialisation status;
- Light steady ON: presence of DES malfunction.
- DRL LIGHT (GREEN)
- Indicates DRL lights status (not present in China, Canada and Japan versions).
- Light OFF: DRL light off;
- Light steady ON: DRL light active;
- Light ON flashing: DRL light in fault.
- DTC INTERVENTION (AMBER YELLOW)
- Light OFF: no intervention;
- Light steady ON: advance cut or injection cut.
- OVER REV / IMMOBILIZER SYSTEM
- Over rev:
- Light OFF: no intervention;
- Light ON flashing: limiter;
- Light steady ON: first threshold (RPM no. before the limiter kicks in).
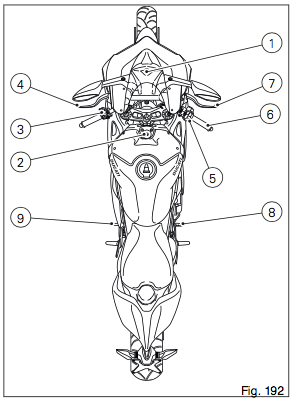
Position of motorcycle controls
This section shows the position and function of the controls used to ride the motorcycle. Be sure to read this information carefully before you use the controls.
- Instrument panel.
- Key-operated ignition switch and steering lock.
- Left-hand switch.
- Clutch lever.
- Right-hand switch.
- Throttle twistgrip.
- Front brake lever.
- Rear brake pedal.
- Gear change pedal.
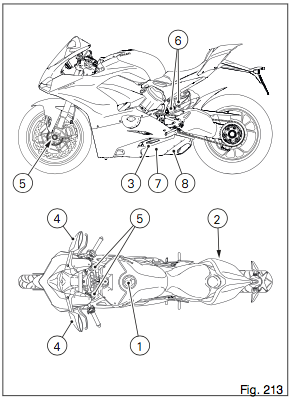
Position on the vehicle
This section shows the position and function of the controls used to ride the motorcycle. Be sure to read this information carefully before you use the controls.
- Tank filler plug.
- Seat lock.
- Side stand.
- Rear-view mirrors.
- Front fork adjusters.
- Rear shock absorber adjusters.
- Catalytic converter (both sides).
- Exhaust silencer (both sides).
Running-in recommendations
Maximum rotation speed
Rotation speed for running-in period and during standard use (rpm):
1) Up to 1,000 km (621 mi);
2) From 1000 km (621 mi) to 2500 km (1553 mi).
Up to 1,000 Km (621 mi)
During the first 1000 km (621.37 mi), keep an eye on the rev counter. It should never exceed: 5,500÷ (included) 6,000 rpm.
During the first hours of riding, it is advisable to run the engine at varying load and rpm, though still within recommended limit.
Strict observance of running-in recommendations will ensure longer engine life and reduce the likelihood of overhauls and tune-ups.
During the first 1000 km (621 mi) (Running-in period), i.e. when the Odometer displays a value <= (lower than or equal to) 1000 km (621 mi), the pre- warning area, indicated in orange (Orange area), both for the bargraph filling and the display of the relevant number, is displayed when reaching 6000 rpm. During the running-in period we recommend not to exceed 6000 rpm, thus the instrument panel will not display the bargraph "Orange area".
To this end, roads with plenty of bends and even slightly hilly areas are ideal for a most efficient running-in of engine, brakes and suspensions.
For the first 100 km (62 mi) use the brakes gently. Avoid sudden or prolonged braking. This will allow the friction material on the brake pads to bed in against the brake discs.
For all mechanical parts of the motorcycle to adapt to one another and above all not to adversely affect the life of basic engine parts, it is advisable to avoid harsh accelerations and not to run the engine at high rpm for too long, especially uphill.
Furthermore, the drive chain should be inspected frequently. Lubricate as required.
Removing the fairing
To carry out some maintenance or repair operations, some motorcycle fairings must be removed.
Warning
Failed or incorrect refitting of one of the removed components could cause its sudden detachment while riding resulting in loss of control of the motorcycle.
Important
At every reassembly, to avoid damaging the painted areas and the Plexiglass windscreen, always place the nylon washers at the retaining screws.
Important
Have the fairing removal performed at a Ducati Dealer or Authorised Service Centre.
Change air filter
Important
Have the air filter maintenance performed at a Ducati Dealer or Authorised Service Centre.
Checking coolant level and topping up, if necessary
Check that coolant in the expansion reservoir is between the MIN (1) and MAX (2) marks on the visible sticker by removing the right half-fairing. Top up if the level is below the MIN mark.
Cheking brake and clutch fluid level
The levels should not fall below the MIN marks on the respective reservoirs.
If level drops below the limit, air might get into the circuit and affect the operation of the system involved.
Fluid must be topped up and changed at the intervals specified in the scheduled maintenance table reported in the Warranty Booklet; please contact a Ducati Dealer or authorised Service Centre.
Brake system
If you find exceeding clearance on brake lever or pedal and brake pads are still in good condition, contact your Ducati Dealer or authorised Service Centre to have the system inspected and any air drained out of the circuit.
Warning
Brake and clutch fluid can damage paintwork and plastic parts, so avoid contact.
Hydraulic fluid is corrosive; it may cause damage and lead to severe injuries. Never mix fluids of different qualities. Check seals for proper sealing.

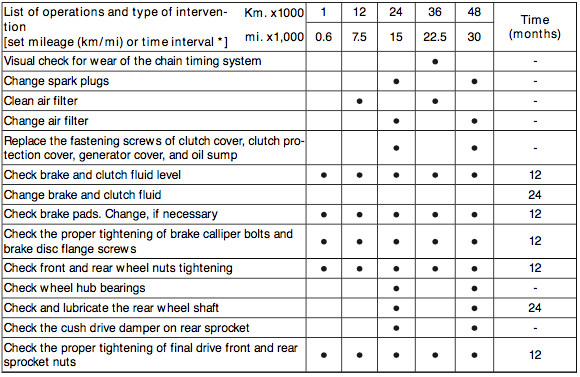
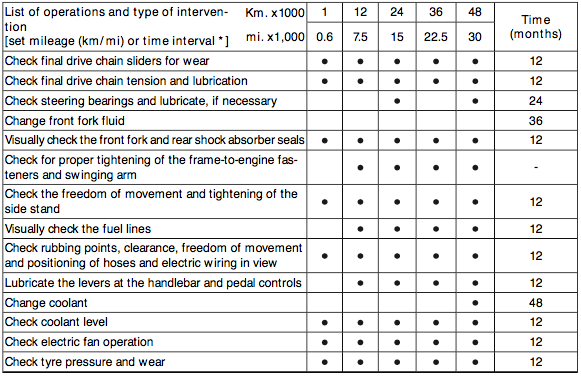
Scheduled maintenance chart: operations to be carried out by the dealer
Warning
This scheduled maintenance chart is designed for a road use of the Panigale V4. If it is used on the track, even if not during sport competitions, all parts of the motorcycle are more stressed so the routine maintenance operations must be carried out more frequently than indicated.
Warning
Please contact a Ducati Dealer or authorised Service Centre where you can receive customised service advice according to the sport use you make of your Panigale V4.

Links to download the owner's manual for your Ducati.
Warning
This page is NOT the full owner's manual for the Panigale 4s. This page was made with love for Ducati to demonstrate the best bike ever. Please donwload the full manual from Ducati